- Application declaration
- Install NodeJS Agent
- NodeJS Agent configuration
- Launching the agent with your application
The Nudge Node.js agent allows you to correlate application traces and performance metrics in order to quickly identify performance bottlenecks and problematic service calls. *The Node.js agent can monitor applications started using commands such as:
node app.js
keystone app.js
etc...
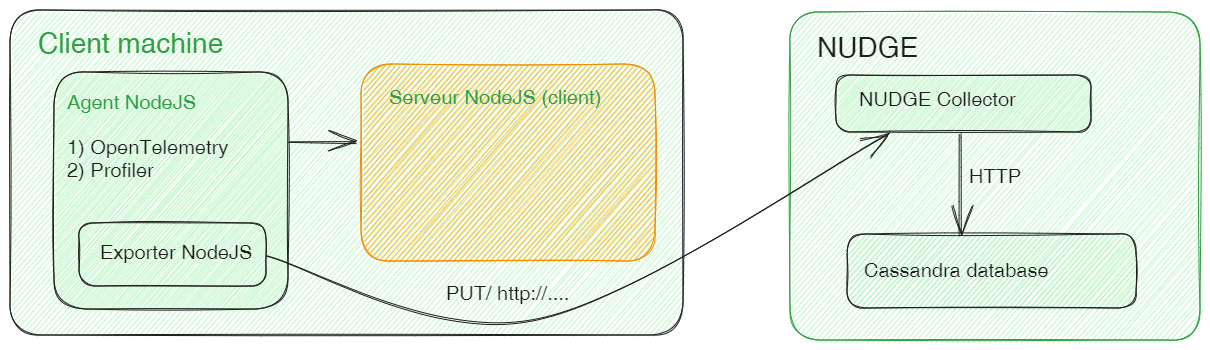
To monitor NodeJS applications, Nudge APM provides a probe composed of two integrated elements :
- ⚠️ The Native NodeJS Profiler (inspector) (currently disabled in this version).
- OpenTelemetry, which captures information about requests sent to or received from the client server. In this version, only OpenTelemetry data is collected. The NodeJS probe collects OpenTelemetry metrics and sends them to the Nudge APM portal.
There are four steps to installing a probe on a NodeJS application:
- Application declaration in the Nudge APM interface
- Agent installation on the Windows/Linux server
- Agent configuration by modifying the configurationAgentNodeJS.ini file in its root folder.
- Checks
Application declaration
-
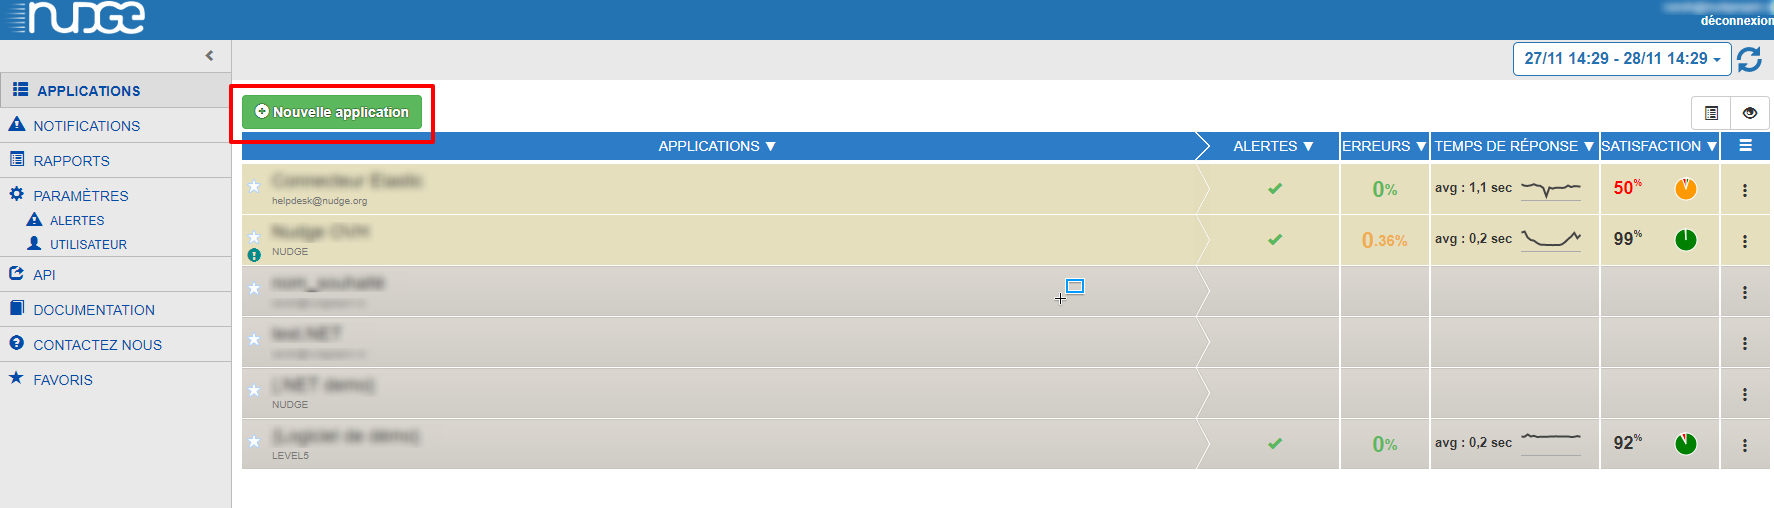
From the Nudge APM main dashboard, click on the New application button.
-
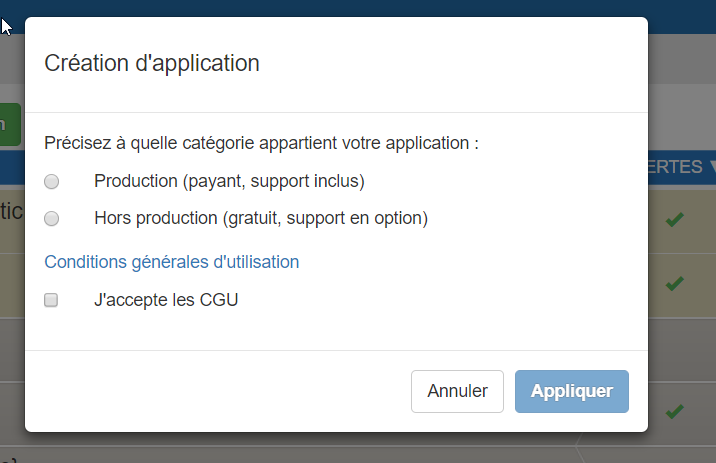
Select the type of application environment and accept the terms and conditions.
-
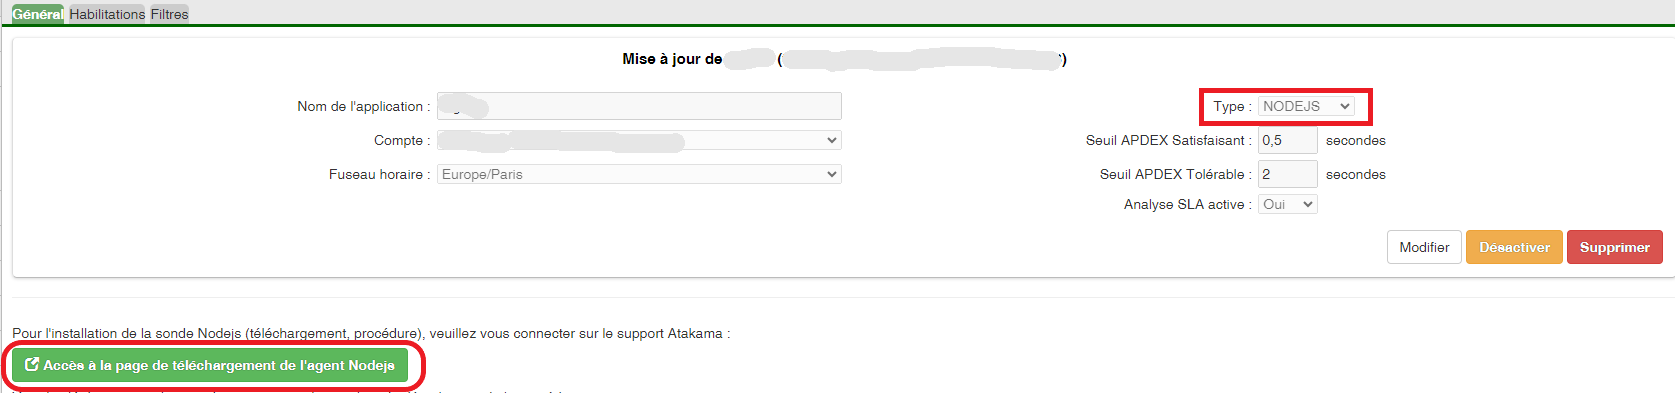
Enter the characteristics of your application, taking care to select the type of application: NodeJS

Install NodeJS Agent
From the NPM package
- Install the agent with the command:
npm i agent.nodejs.nudge
From ZIP file
-
Download the agent: from the application creation or setup screen, you’ll find a link to download the agent:
- Unzip the NodeJS Agent as is into any folder, or create a new one beforehand.
- You need to download the NPM packages. To do this, open a console in your agent NodeJS’s root folder.
- Run one of 3 files, depending on your application’s OS:
- install.bat (windows)
- install.ps1 (windows)
- install.sh (linux)
The 3 installation files contain a token that allows you to download and install all packages, including OpenTelemetry, dedicated to the NodeJS agent.
⚠️ Note -> Under docker, the following lines are required for the token to be taken into account during package installation by > npm i
RUN apt install -y git
RUN apt install -y util-linux
RUN apt install -y make gcc g++ python3
RUN git config --global url."https://github_pat_XXXXXXXXXXXXXXXXXXXXXXXXXXXXXXXXXXXXXXXXXXXXXXXXXXXXXXXXXXXXXXXXXXXXXXXXXXXXXXXXXX@github.com/".insteadOf "ssh://git@github.com/"
RUN npm install
NodeJS Agent configuration
- If you have installed the VIA NPM agent, you must first copy the configuration file to a folder other than the agent folder, as it is not recommended to modify a package in a /node_modules folder.
- Then configure the NodeJS Agent either by
- the environment variables follow the naming convention NUDGE_[SECTION]_[KEY]. Example: NUDGE_NODEJS_AUTOINSTRUMENTATION, NUDGE_NUDGE_URL, etc.
- the configurationAgentNodeJS.ini configuration file.
Environment variables take precedence over the values of the configuration file parameters.
The advantage of modifying the configuration file is that for certain parameters, it is not necessary to restart the agent.
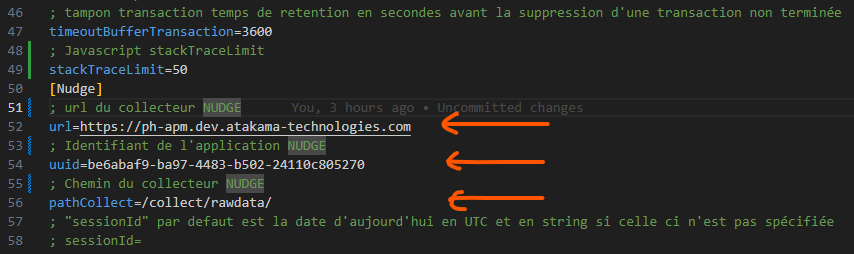
⚠️Retrieve the application key supplied by NUDGE when it was declared in the GUI, and paste its value into the [Nudge]app_id field.
⚠️The url for directing metrics to the NUDGE collector must be set to [Nudge]url.
⚠️The path of the NUDGE collector must be set in the [Nudge]pathCollect field.
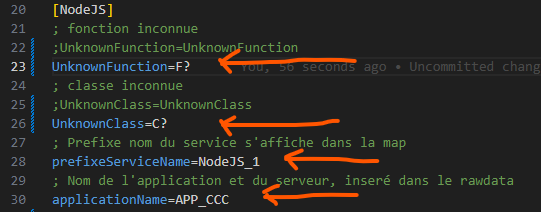
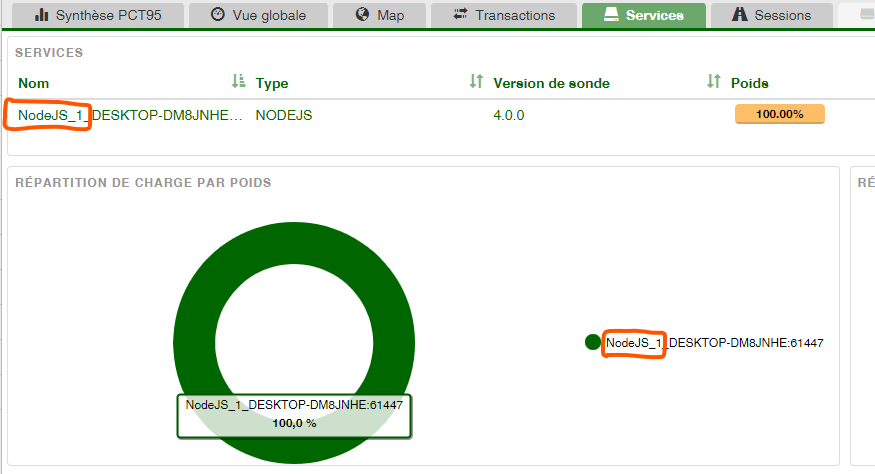
- It is possible to modify the name of unknown classes and functions by default for profiler display, as well as the prefix of the session name that will be added in the “Service” tab, “Name” column.
- [NodeJS]refreshLoadCPU CPU load calculation period.
- [NodeJS]filterHeader lists the names of the headers to be retrieved in an array. If the array is empty, all request headers (OpenTelemetry) are retrieved.
- [Drives]refreshScanDrives period between each disk metric measurement in minutes.
- [NodeJS]sendUserConnectionString adds the user to the Connection String of a database. This information will be visible in the MAP tab of Nudge. To be checked by the client if this leads to security problems.
- [NodeJS]stackTraceLimit maximum number of lines that the stack JavaScript can send to the Nudge collector.
- [NodeJS]autoInstrumentation which allows you to disable (false) or enable (true) OpenTelemetry.
- Other fields are present whose usefulness is oriented towards “functionality testing and agent fine-tuning “ pre-configured for optimum operation, such as:
- ⚠️ (Do not modify - false) [NodeJS]recordCollecte allows you to save JSON files of raw OpenTelemetry data to disk.
- ⚠️ (Do not modify - true) [NodeJS]waitEndService waits for the OpenTelemetry closure of a service call (traceId) before sending it to the Nudge collector.
- ⚠️ (Do not modify) [Console] displays information in the console and/or in log files.
- ⚠️ (Do not modify - comment) [Nudge]sessionId agent NodeJS startup session identifier.
- ⚠️ (Do not modify - 3600) [NodeJS]timeoutBufferTransaction time to retain the OpenTelemetry data of a traceId (transaction) before sending it to the Nudge collector.
Launching the agent with your application
If you launch your application as follows:
node "./server.js"
From the NPM package: The agent is installed in the /node_modules folder of your application.
To launch the agent in NPM package format, for example:
node -r agent.nodejs.nudge [app.js]
From the ZIP file: The agent is outside your application
To launch the agent in ZIP format, add the agent entry point as follows:
node -r "[.path to NodeJS agent]/agent_Nudge.js" to your application's startup script.
You will use the “-require” or “-r” flag, which injects the NodeJS agent as follows:
node -r "[.path to NodeJS agent]/agent_Nudge.js” “./server.js"
- If your application launches without typing “node”, such as “keystone”, which does not have an injection switch.
It is still possible to inject the NodeJS agent by inserting the following line into your application’s entry point file.
require("[.path to NodeJS agent]/agent_Nudge.js");
If you encounter any difficulties during installation, please do not hesitate to contact us: support@atakama-technologies.com